


Remote control your Rock64’s desktop by installing and configuring VNC and using a SSH tunnel with…


In need to remote control your Rock64’s desktop? Here is a small step by step guide based on a Rock64 running on Armbian Debian 5.65.
How to install VNC and connect to it through a secure SSH tunnel?
Before continuing be sure to be a sudoer, that means that the user you’re using has the sudo privilege.
Installing the VNC server
First of all we’ll update the packages, install all the dependencies and install the VNC server:
sudo apt-get update
sudo apt-get install xfce4 xfce4-goodies xorg dbus-x11 x11-xserver-utils
sudo apt-get install tigervnc-standalone-server tigervnc-common
Once the VNC server has been installed, we need to set up the password for the future connection. Notice that we are not using sudo this time, because we want to connect with the current user:
vncserver

Setting up the password and launching the VNC server
Choose a password that you’ll use to connect to your Rock64 through the VNC client. You can answer no to the view-only password question.
Configuring the VNC server
First we stop the running VNC instance with:
vncserver -kill :1
Then we create a configuration file to configure TigerVNC to use Xfce. Copy/paste the following lines
cat << EOF > ~/.vnc/xstartup
#!/bin/sh
unset SESSION\_MANAGER
unset DBUS\_SESSION\_BUS\_ADDRESS
exec startxfce4
EOF

The > will be added automatically
Now we give the right permissions to this file:
chmod u+x ~/.vnc/xstartup
We can predifine the geometry and dpi that’ll be used with command. I suggest you to use copy and paste:
cat << EOF > ~/.vnc/config
geometry=1920x1084
dpi=96
EOF
Starting the VNC server automatically. We are going to create a service that the system will start at boot time, please use the following commands, be sure to add your user name and whatch out for the apostrophes as Medium replace the chars with another one (have a look at the screenshot):
cat << EOF > ~/vncserver@.service
\[Unit\]
Description=Remote desktop service (VNC)
After=syslog.target network.target

\[Service\]
Type=simple
User=***your user\_name\_goes\_here***
PAMName=login
PIDFile=/home/%u/.vnc/%H%i.pid
ExecStartPre=/bin/sh -c **‘**/usr/bin/vncserver -kill :%i > /dev/null 2>&1 || :’
ExecStart=/usr/bin/vncserver :%i -geometry 1440x900 -alwaysshared -fg
ExecStop=/usr/bin/vncserver -kill :%i

\[Install\]
WantedBy=multi-user.target
EOF
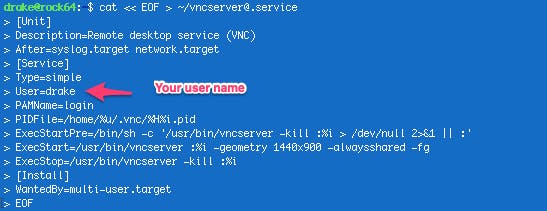
The service has been created
Now we have to set the correct owner for the file and move it in the right folder:
sudo chown root:root vncserver@.service
sudo mv vncserver@.service /etc/systemd/system/
We notify systemd that a new service is available by running this command:
sudo systemctl daemon-reload
And we enable the service, that means the Rock64 will start this service at boot time:
sudo systemctl enable vncserver@1.service
We start the VNC service by using this command:
sudo systemctl start vncserver@1.service
And verify that the service is successfully started:
sudo systemctl status vncserver@1.service
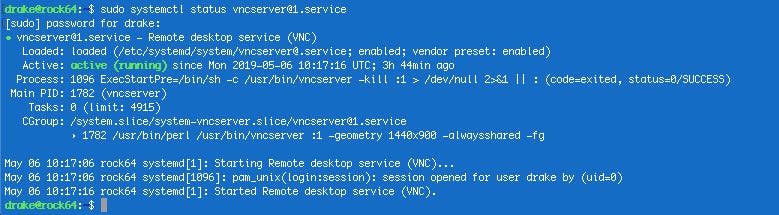
The service is running just fine
Setting up the SSH tunnel for Linux or macOS
You have to run the following command on any macOS or Linux that wants to connect to the Rock64 through the VNC by creating an SSH tunnel:
ssh -L 5901:127.0.0.1:5901 -N -f -l **rock64\_username** **your\_rock64\_ip**
Don’t forget to put in the previous command your username and the Rock64’s IP address.
You’ll be prompted for the password you’ve just set previously with the command vncserver.
Now to connect, just download any VNC viewer (TigerVNC, TightVNC, RealVNC, VNC Viewer) and try to reach for:
localhost:5901
Setting up the SSH tunnel for Windows
You’ll need to use PuTTY SSH client in order to create the SSH Tunneling:
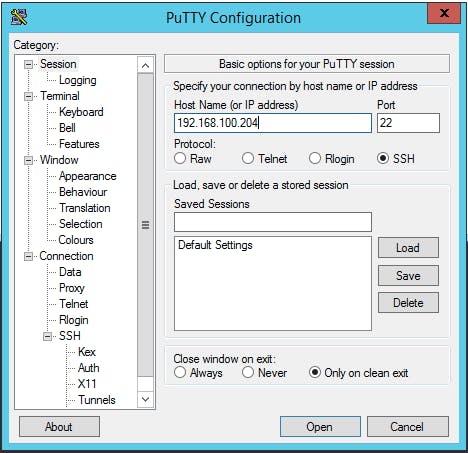
On the left pane, go to Connection, choose SSH and click on Tunnels. The port you have to set is 5901 in the source port field and set your Rock64’s ip address, followed by :5901, in the Destination field:
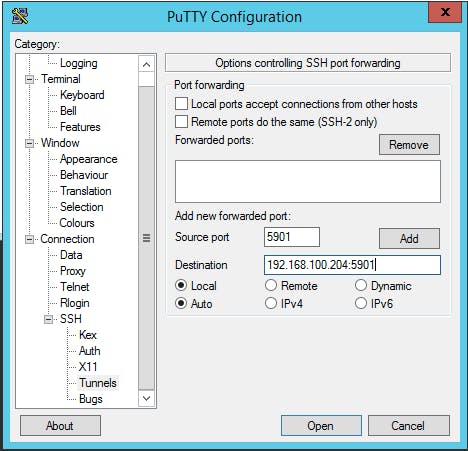
You can save these settings by going back to Session.
Open this session and now connect usingany VNC viewer (TigerVNC, TightVNC, RealVNC, VNC Viewer) trying to reach for:
localhost:5901
Graphically check the health of your Rock64 with S-Tui
S-Tui is a graphical interface to let you monitor your Rock64 through SSH. It is pretty straightforward to install, just enter these commands:
sudo apt-get install lm-sensors
sudo sensors-detect
Say yes to all questions and carry on with these commands that will install s-tui:
sudo apt-get install python3-pip stress
sudo apt-get install python3-dev

sudo -H pip3 install --upgrade setuptools
sudo -H pip3 install ez\_setup
sudo -H pip3 install s-tui
Now it has been installed, to launch it:
sudo s-tui
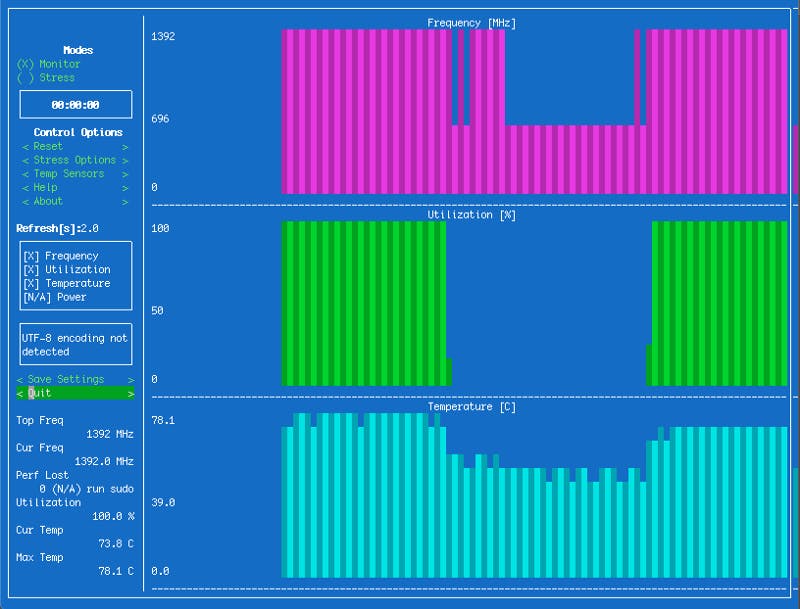
Too bad the Rock64 has no Power sensor
Final word
Now it’d be easy to manage your Rock64 from your local computer using a graphical interface.
To configure your VNC server to start a display for more than one user, create the initial configuration and set up the password using the vncserver command. Don’t forget to create a new service file using a different port.