

Running a super low cost DigiByte Scrypt Miner Rig with a Raspberry Pi 3 model B+ and a FutureBit…


New to mining crypto-money or just fancy to run the smallest DigiByte Scrypt mining rig? Dont’ go any further, here is the ultimate step by step guide.
What is Digibyte and why would I mine it?
DigiByte is at the same time a decentralized blockchain and a cryptocurrency (DGB). It is not specifically limited to being cash, but it excels at it.
Basically it has been created in 2014 on the same blockchain technology that Bitcoin (UTXO), but it has improved a lot since. Using DigiByte let’s you have fast, reliable and secure payments, and with lost cost transaction fees.
To increase security DigiByte let people mine it with several different algorithm and without being too techy, it means that it almost impossible to hack or steal your DigiByte.
If your are a beginner or if you love good tech, DigiByte is my mining coin of choice for all these reasons and much other too.
If you’re interested in learning more about Digibyte, just read this article : https://coincentral.com/what-is-digibyte/

How much power will my miner use?
Using the Raspberry Pi 3 model B+ uses, according to the Raspberry Pi website FAQs, about 500mA with a 2.5A power supply.
The FutureBit Moonlander 2 is an USB miner that is set to use about 5W depending if you overclock it or not.
So if you’re using your Raspberry only for mining with one Moonlander 2 and not for something else and you’re living in the USA, it’s going to cost you something between $10 and $15 a year. It’s not a lot to have good fun and to learn something.
What hardware do you need?
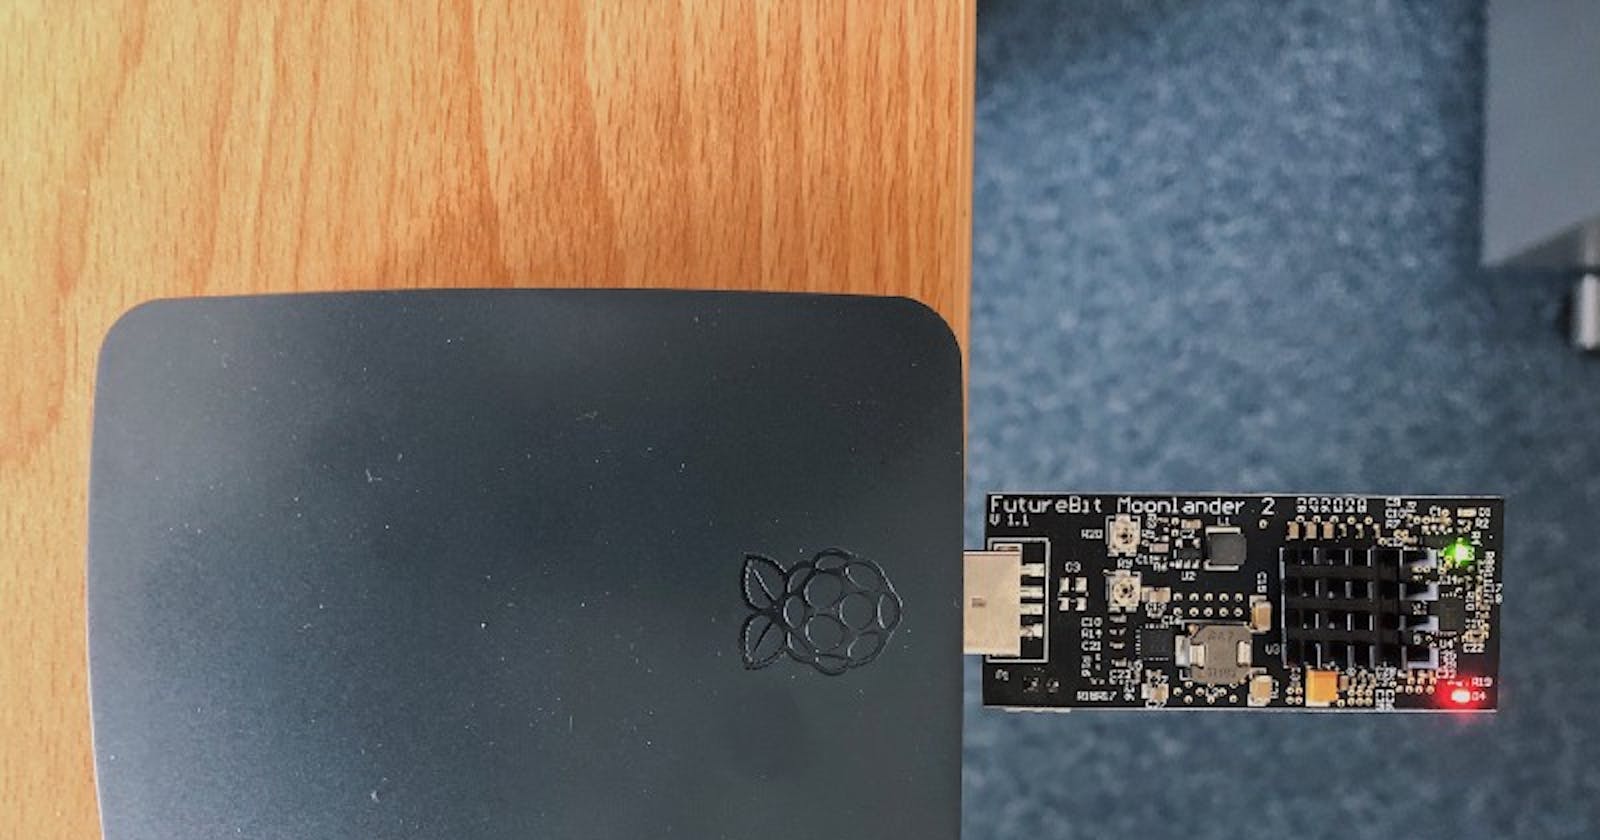
The Raspberry Pi
First you need to buy a Raspberry Pi 3 model B +, it is a common hardware that you can order from anywhere from Amazon, Ebay or any computer part stocklist near to you.
You can also buy bundles or starter-kits including Power Supply, the Pi, casing and preinstalled Micro SD with NOOBS (the Operating System).
In addition to the main board, I recommend you to buy the following:
- Micro USB Power Supply (2.5A min for the Pi 3B+)
- 16GB Micro SD card (preferably preinstalled with NOOBS)
- A way to use the Micro SD card in your PC (Such as a USB SD card reader)
- Network cable if you don’t want to use the wifi connection
- An HDMI cable
- A temporary computer monitor or a TV set
- A temporary keyboard and mouse
- And of course a fancy casing, to protect the main board and to the show it off
The Miner
In this guide, I’m using one FutureBit Moonlander 2 USB stick that you can buy here : https://shop.futurebit.io
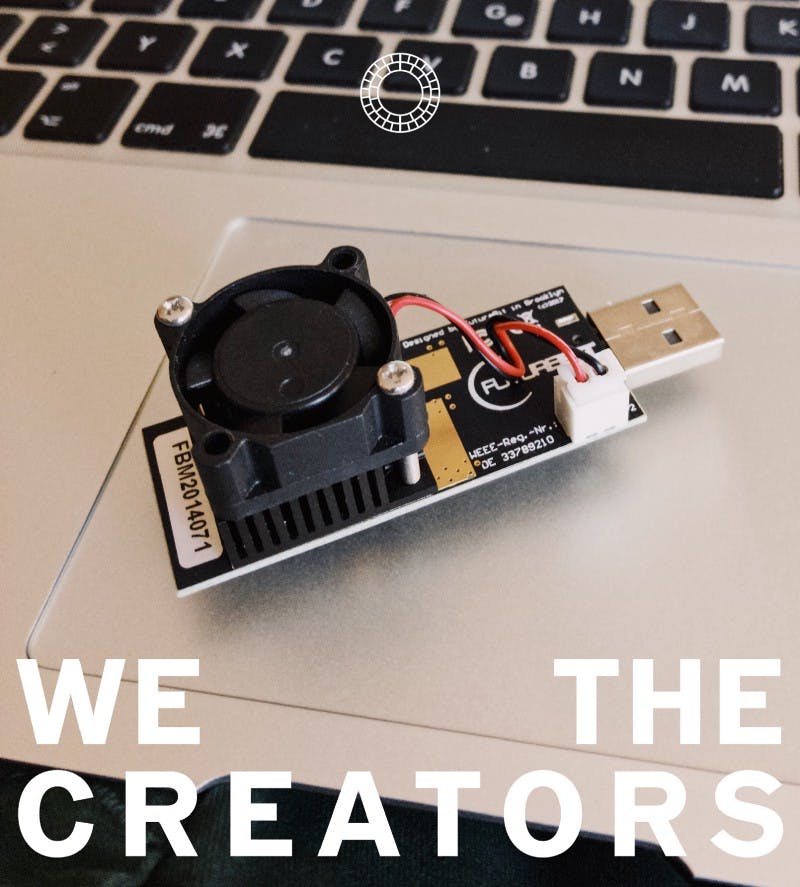
FutureBit Moonlander 2 USB stick
If you decide to mine with more than a Moolander 2, it is possible, but keep in mind that you’ll need a good powered USB hub to make your little mining rig work.
While you wait for your hardware to come, just set up a DigiByte Wallet
Before being able to mine $DGB you will need to have a wallet to keep all these precious coins that you’ll receive. There are a lot of ultra-secure wallets for storing your DigiBytes such as Ledger or Trezor, but I recommend you beginning with the official Digibyte Wallet for your phone. It is a secure and handy wallet you’ll have in your pocket, grab it on the App store or the Google Play store.
The process is pretty straightforward, you have to think to keep your private key, I mean the 12 words that you received, in a safe place.
Now you need to have an address to receive DGB directly into your wallet on your phone. This is pretty easy, click on the plus sign at the bottom of your screen and choose Receive. You’ll get a screen like this one. What you are looking for is the address looking like this one: DG2WeGtp5KozwtxmGpSpTrRCCos8WE9vt1
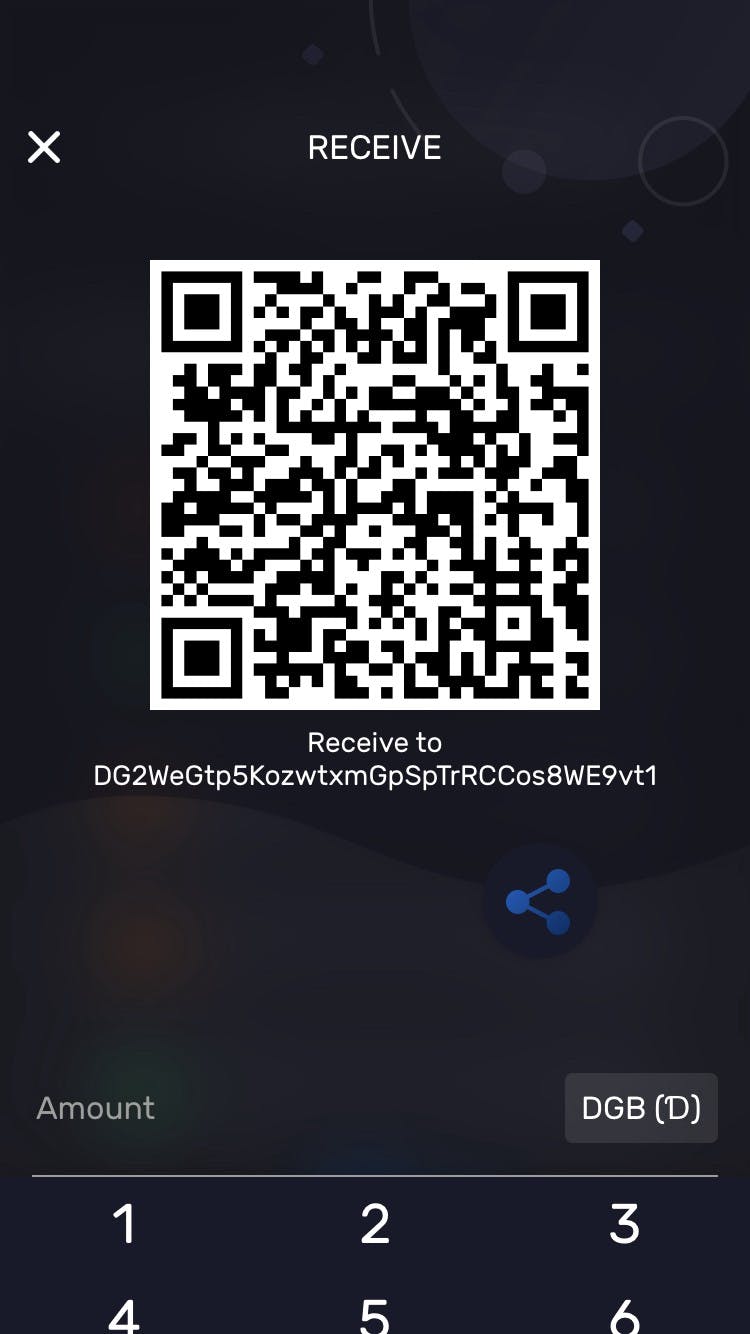
One of your public addresses for your DigiByte wallet
Please note that this address will change everytime you’ll click on receive, that’s normal. But if you keep one of them and send DigiByte to this address you’ll receive them in your wallet. In fact every address that is shown here will let you receive DGB in your wallet.
Still received no hardware? Just open an account on a Pool for future mining
Mining is a hard task, you can do it alone, but it’ll be difficult to set it up and the kind of mining rig we are building is not the best choice to do it. There for I recommend you to mine in a pool, dividing the difficulty among a lot of people.
My pool of choice is Multipool.us because it is cool to use and has great FAQs, and you receive other coins at the same time, such as Dogecoin, but there are other great pools such as The Block Factory and Supernova. You can experiment with other pools that offer Scrypt mining and coins.
Register at Multipool.us
Register at Multipool.us is pretty straightforward: head to the web site and click Register, you’ll have to choose an username, password, email and PIN code. You can set a donation if you like, but I wouldn’t recommend it as your miner is already small enough.
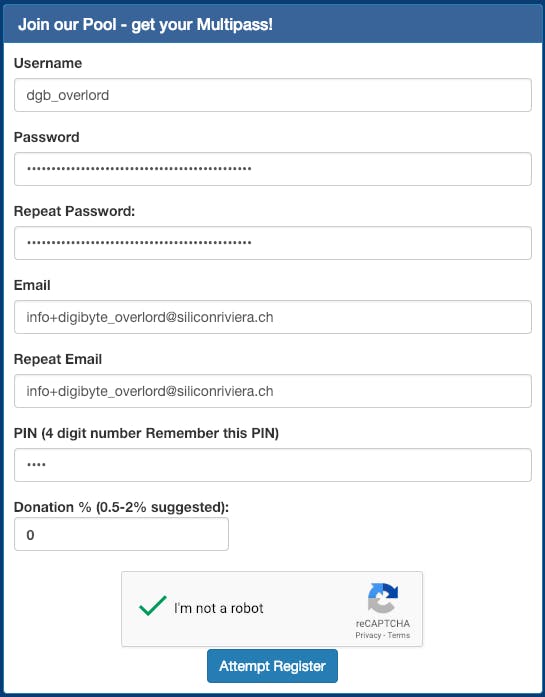
Multipool’s registration form
Now login and go to the menus, choose Account and Workers. On the middle of the window click Add Worker, call your new worker with the numer 1 and set the share difficulty to 2048.

Creating a new worker
Now time to set up your DigiByte Address to get your DigiByte directly into your wallet. Go to Account and choose Your Balances. Scroll down until the DigiByte (Scrypt) line. Don’t choose DigiByte (SHA256), this is for another kind of miner.
In the input paste your public DigiByte Address that you go in your DigiByte wallet, when you click on the Receive button.

Enter the DigiByte address you’ve got in your wallet when clicking on receive
After that click on the button at the end of the line and enable the Auto Payout function. That means that when you have mined at least 0.1DGB Multipool will send it directly to your wallet at the address you just entered.
Finally the hardware is here, configuring the hardware
If you chose to get a preinstalled SD card, good for you and you don’t need to make these steps.
First download on your PC the NOOBS OS for Raspberry here: https://www.raspberrypi.org/downloads/noobs/

You are looking for the full version not the lite one
Once you have the OS, download Win32DiskImager from here if you’re on a PC: https://sourceforge.net/projects/win32diskimager/ or ApplePi-Baker here if you are on a Mac: https://www.tweaking4all.com/software/macosx-software/macosx-apple-pi-baker/
This will allow you to take the NOOBS image file that you have, and put it onto the SDCard in a special way that will allow your Raspberry Pi to start up from it.
For the Mac, you’ll have to insert your MicroSD card, select it and click on Prep for NOOBS. This step will format the SD card and create a bootable partition. After that, head to IMG Receipe, choose your downloaded NOOBS image file and click on Restore.
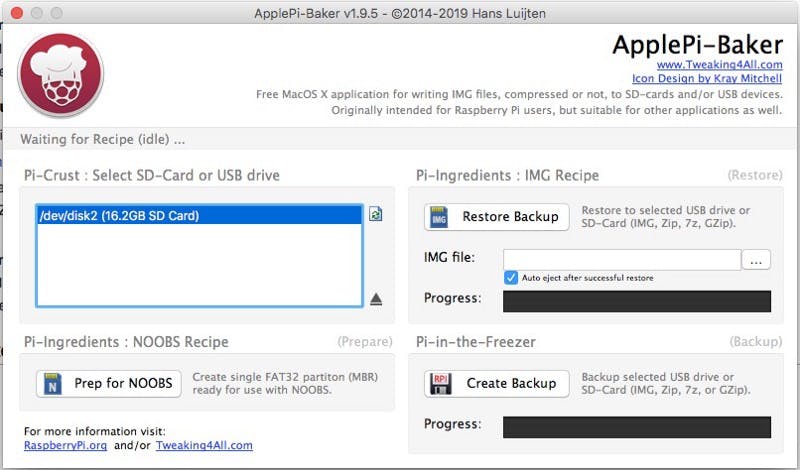
Prepare your SD card for NOOBS on Mac
For PC, take your MicroSD card and pop it into your computer in the card-reader. You’ll want to open Explorer and confirm the drive letter. Once you’ve confirmed the drive letter, open up Win32DiskImager. Click on the blue folder icon next to the “Image File” box, and find your Raspbian image that you’ve extracted previously:

If yours says .zip, then you’ve chosen the wrong file, or, you need to extract the .img file out of the .zip
Make sure your Device matches the drive letter for your SD Card, and choose “Write”.
When it is done eject the card and plug it in the Raspberry.
First boot up of your Raspberry Pi
Now it is time to boot up your Raspberry, attach the Monitor with the HDMI cable, the keyboard, the mouse and if you need it the ethernet cable.
Don’t forget to pop-in your MicroSD card, it is going in the small slot upside-down.
Plug the power supply and the red light come solid. You’ll see a green light flickering, it says that it is reading the card.
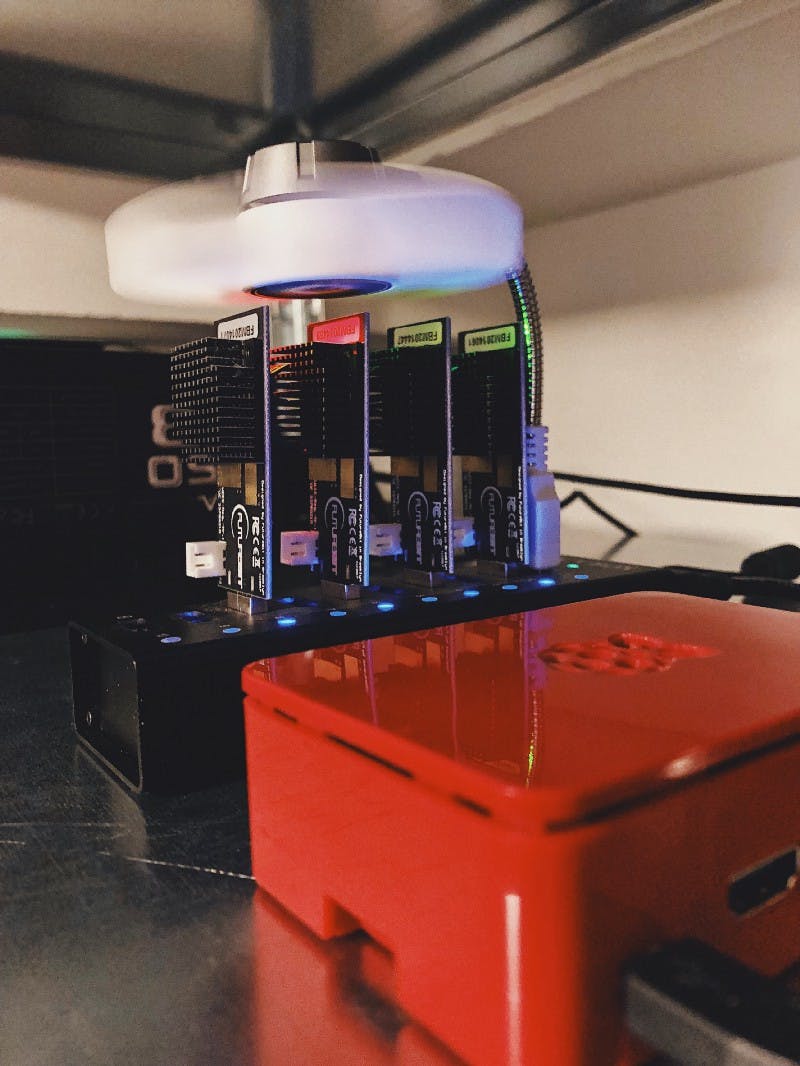
Another Raspberry mining rig based on the same idea I made for a friend, this one has been mining DGB for almost 6 months without any reboot.
Install drivers and BFGminer for the Moonlander 2
So we are finally at the interesting part, we’d like to make this Moonlander mine. It is pretty easy, just follow these steps:
- Open a terminal
- First update and upgrade your system
sudo apt-get update

sudo apt-get upgrade -y
- We have to install these mandatory packages:
sudo apt-get install -y libcurl4-gnutls-dev libjansson-dev
- Now we prepare everything for the software that will drive the miner. First we go to our home folder
- now we download the software using this command
wget https://github.com/jstefanop/bfgminer/releases/download/bfgminer-5.4.2-futurebit2-beta2/bfgminer_5.4.2-futurebit2_linux_armv6.tar.gz
- To decompress the archive we just downloaded and set the good rights, just use:
tar -xzf bfgminer\_5.4.2-futurebit2\_linux\_armv6.tar.gz

chmod -R +x bfgminer\_5.4.2-futurebit2\_linux\_armv6
Now let see if the software do mine. Please connect your Moonlander in any USB port and type these commands :
cd bfgminer\_5.4.2-futurebit2\_linux\_armv6
./start\_moonlander2
At this point the software is launching and the miner begins to mine, but it is not mining for you right now, we do have to make some changes to your start_moonlander2.sh script :
nano start\_moonlander2.sh
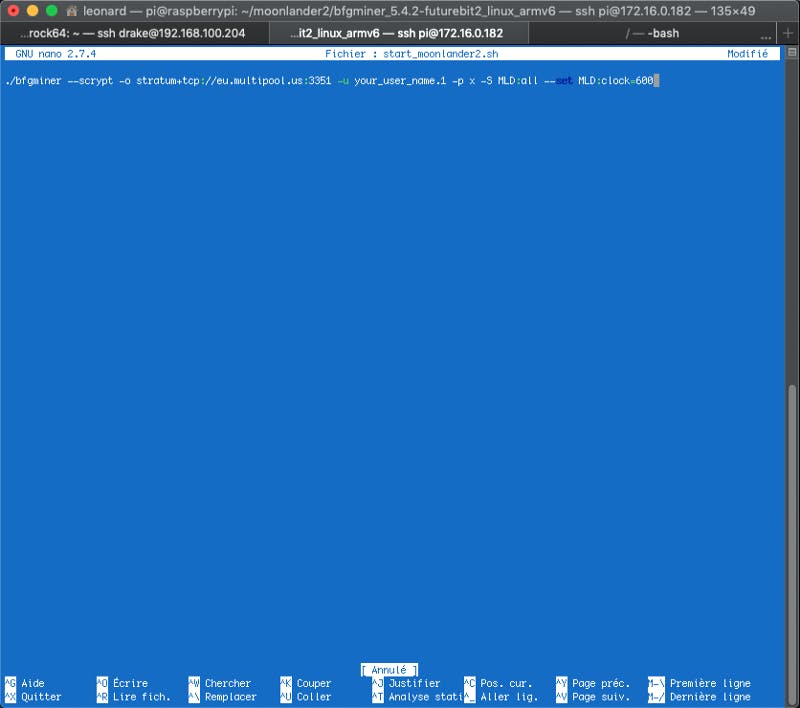
Please modify this line with the pool address, your username and your worker’s name
You have to modify the first line as shown on the previous screenshot with the following information:
- the pool address : stratum+tcp://eu.multipool.us:3351
- your mutlipool’s username following but a dot and your multipool’s worker’s name.
- the password is always x (or anything else, it is not used)
- the frequency factor, for now let it at 600, which is the default.
Here is a list of the valid frequencies :
384, 450, 480, 540, 576, 600, 612, 625, 636, 648, 660, 672, 684, 700, 720, 744, 756, 768, 796, 832, 852, 876, 900, 924, 954
If the miner is directly plugged in the Pi, you shouldn’t use a value greater than 600 as the Raspberry’s USB port is not strong enough.
For those who wants to experiment with fine tuning and overclocking their ASIC miner just refer to this page, there is a world of settings out there : https://bitcointalk.org/index.php?topic=2420357.msg24766858#msg24766858
Now run your miner and test these settings
./start\_moonlander2.sh
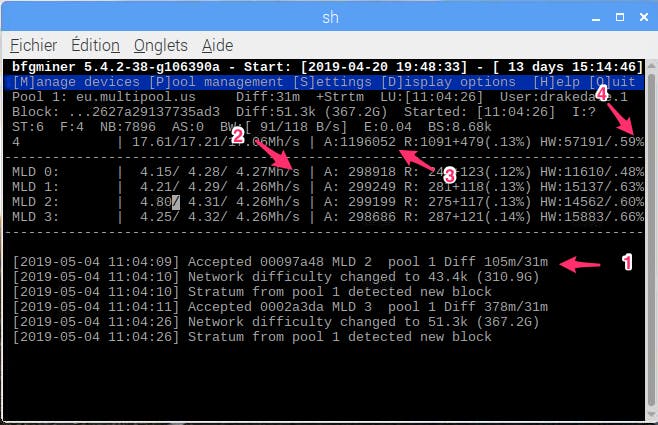
Control screen you got when you launch start_moonlander2.sh script
Here is few explanation of what does this screen means :
- #1 This is an accepted share, this is what we are looking for, each time you got one of them, you’ll receive a bit of DigiByte when the block will be found.
- #2 This is the speed of your miners. On this screen we can see 4 miners. You should have only one line and the speed should be between 3 and 4Mh/s.
- #3 This the total of accepted shares since the miner has been launched
- #4 is the number of hardware errors. This is normal to have hardware errors, it is ok if this number is between 1% and 3%, it shouldn’t be more than 3%
If you’ve got too much hardware errors, try to lower the MLD:clock setting. Here is a list of the valid numbers you can try:
384, 450, 480, 540, 576, 600, 612, 625, 636, 648, 660, 672, 684, 700, 720, 744, 756, 768, 796, 832, 852, 876, 900, 924, 954
And now wait for your first DGB to come. You have to wait for a block to be found by your pool to receive anything for your shares. The amount of what you’ve mined will wait for you at multipool.us until you reach the threshold of automatic payement, when it will send you everything to you account.

Your balance at multipool.us, you still haven’t reached the 0.1 needed for the automatic payout
Make your Raspberry Pi mine automatically when your restart
Here are the actions you’ll have to take in order to make your miner start automatically when your restart your Pi:
cd ~
sudo nano .config/lxsession/LXDE-pi/autostart
In the file, just add this line after @xscreensaver -no-splash. This will tell the Raspberry Pi to run the start_moonlander.sh in a terminal when your session will open the first time.
lxterminal -e sh ~/bfgminer\_5.4.2-futurebit2\_linux\_armv6/start\_moonlander.sh
Just reboot to try if it works…
Mining with a hint of High Availability (HA)?
From time to time the pool you’re mining on will go offline for a scheduled maintenance or an outage. During this time, your miner will stop mining, but will still using power and it is a loss of money and coins.
You can ask BFGMiner to automatically switch to another pool if the first one offline.
To make it so, just open a new account to another pool (by example The Block Factory or Supernova), repeat the same process you did for Multipool.us: add a new miner, add your digibyte address and set the autopayout threshold. Look for the right url where you have to mine, generally it is explained in a Getting started section.
To set several pools just edit bfgminer.conf with the following command and use the example in the next screenshot to configure yours:
nano ~/.bfgminer/bfgminer.conf
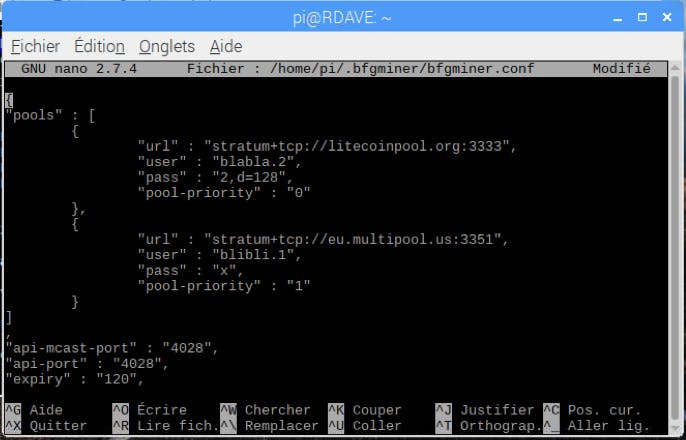
Example of bfgminer.conf file, in this case the miner will firstly mine litecoin on litecoinpool.org and if this pool is off it will automatically mine DigiByte on multipool.us
The best option is to go with 2 pools, the first one will be your main pool, the second one will be the backup pool. If you like to mine different coins, it is possible: in the example above this miner is mining Litecoin by default and switch automatically to DigiByte if the first pool is offline. As the Moonlander 2 is an ASIC miner speciallized for the Scrypt algo, you just have to remember to choose another coin that supports Scrypt.
Have you noticed the password for the first pool? It is composed with 2 informations, first the password (in this case the number 2), then a comma and the mention ,d=128, it is only the setting for the difficulty. Some pools ask you to set the difficulty you’d like this way.
When you are set, just save the file and restart the miner. There is also a way to make it directly in BFGminer, more about that can be found here.
That’s all folks, enjoy building your new DigiByte miner and reach me on Twitter if you need help.